Wednesday, April 24, 2013

A nest by the front door!

So what do you do when a dove couple decides to set up camp in a pot by your front door?  About a month ago DH noticed that a pot was starting to get twigs and sticks in it!  Sure enough a mourning dove couple were building a nest!  I was thrilled, the family, not so much!  We know at least one egg was laid, and DH said last weekend, when they were changing shifts!, he spotted a baby!

Here are a few pics:
See her in the upper pot?  That is the screen door in the background.  I have read that both the mother and father will sit on the egg and take shifts going out to feed.  The eggs take 2 weeks to incubate and then there is 2 weeks of fledglings. Then the youngsters may still stick around for 2 weeks.

Here is a sign we put up to discourage people from coming to the front porch:
That has been nice, no solicitors!  We have been using the side gate or garage.

Hope to have a pic of baby soon!  Actually we really want the porch back!  So this pot will be moved when they leave.  I read that they could use the same nest up to 5 times!  Yikes

There has been a crow hanging around, though.  I think I have enough chimes and feeders hanging where he can't get to them, but am keeping watch anyways!

Have a great day,

Laura

update:  our little friend is getting so big!  Mom is even leaving him alone!

Friday, April 12, 2013

Banana Bread to the max!

Just recently we found out that DD, she will be 20 next month!, is lactose intolerant, and sensitive to food dyes!  I have to take my reading glasses to the store to read labels.  Amazed by what is in our food!  We are trying to go back to basics and homemade!  It has been hard for her as she is a cheese and pizza lover, but we are hoping that adjusting the enzymes she will be able to eat those soon!  Anyway, I have been on the hunt for dairy free recipes.  When I ran across this recipe on Pinterest!

Cinnamon Swirl Banana Bread at Lovin from the Oven!  I love a good banana bread, but find that a lot of recipes don't have enough bananas for my taste.  Well this one is awesome, there are 3 bananas per loaf!  And it was dairy free!

The first time I made this I had 6 ripe bananas lying around.  So I doubled the recipe and it was awesome!  The 2 loaves didn't last long in my house, maybe 3 days!  I have since made it 2 more times, and both time it flies out the door!  So I thought I would share some of the pics with you.

Using my new iPad stand!. AWESOME, so nice to have it up off the counter.

Glass pans ready to go.  I love these, one was my Aunt's, she passed away last June, and one I found at a garage sale.

Mixing the bananas, sugar, butter, eggs and vanilla.  Don't you love my 'vintage' Sunbeam mixmaster!  I love this mixer.  DH got it for me the Christmas before we moved here, 25 years ago!

Mixing in the flour.

You pour half into the pans then sprinkle with the cinnamon/sugar mixture, of course I forgot to take a pic of that!

I can never get the ha/f measurement down right, oh well, here you can see the cinnamon layer.

Then add the rest of the cinnamon/sugar on the top.  Into the oven they go!
Takes about an hour for 2 loaves.
Just out of the oven!  Yummy goodness.  This was 2 days ago and one loaf is gone and the other will be shortly!  You must try the recipe!  Here is a copy!  Remember I got this from Lovin in the Oven, I cannot take credit for this yumminess!


Cinnamon Swirl Banana Bread
Ingredients
    For the bread:
  • 3 over-ripe bananas, smashed up
  • 1/3 cup melted butter
  • 3/4 cup sugar
  • 1 egg, beaten
  • 1 tsp vanilla
  • 1 tsp baking soda
  • dash of salt
  • 1 1/2 cups flour
  • For the swirl:
  • 1/3 cup sugar
  • 1 Tbs cinnamon
Directions
  1. Preheat oven to 350. Butter and four a loaf pan. Mine was 9 x 5, but you could use any sort, I suppose. Just keep a close eye on it in the oven, and adjust the time as needed
  2. Mix bananas, butter, sugar, egg, and vanilla together. sprinkle baking soda and salt around on top of the banana mixture. Then gently stir in flour. Be careful not to over-mix!
  3. In a small dish, mix together the 1/3 cup sugar and 1 Tbs cinnamon.
  4. Add 1/2 of the batter to the loaf pan and then sprinkle half, or a little more than half of the cinnamon-sugar mixture all over the batter in the pan. Add the rest of the batter, and then sprinkle the leftover cinnamon-sugar on top.
  5. Bake for 50-60 minutes, but remember, if you’re using a different-sized loaf pan, be careful and keep a close eyeball on it!

Enjoy!

Have a great weekend everyone!

Toodles,

Laura

Funky Junk


Wednesday, April 10, 2013

Garden update

Just a quickie update on my veggie garden.  I posted on March 17th that we had planted our tomatoes and such.  I have since added green beans, eggplant and a lemon cucumber!

I took this pic the other day!  Can't believe how much they have grown in only a few weeks!
This was on the 17th:
Crazy huh!  Need to order the manure tea I was going to get.  Here is link for that!
Manure Tea

She is local to me, so thought I would give it a try.  I have heard it works wonders!

Have a great day!

Laura

Tuesday, April 9, 2013

A stand for ipad.


So I am using this for the Spring Pinterest Challenge!  You have heard of it right?


It is put on by some awesome bloggers, Sherry at Young House Love, read it every day!, Katie at Bower Power Blog, have you seen her youngest Weston?  Cautie Patootie to the max!  Emily from Sparkle Meets Pop, and Renee from Red Bird Blue.  Such Fun!


So here it is, my Pinterest inspired project!


Do you ever start a project and then life gets in the way.  It wasn't hard, in fact it was just spray painting and gluing, but geesh.  Anywho...

I had seen these awesome ipad stands on Pinterest.  And since I am always baking using recipes I found on Pinterest, I needed a stand!  So I blame it on Pinterest ")

Here are a few examples:

This one is from Andrea at Queen of Kings.  It is her interpretation of one at Pottery Barn, I like hers better!


This one is from Mamie Janes.  Love this gal's style repurposed to the max!


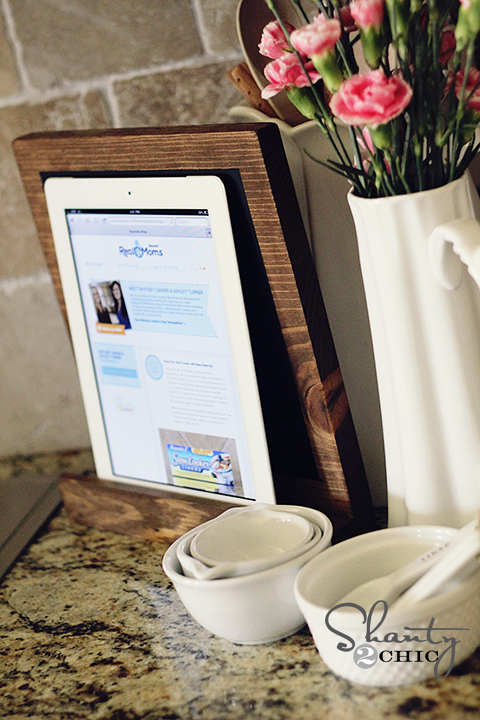
And finally this one from the gals at Shanty to Chic.
DIY iPad Stand


So I thought I can do that!  At first I was going to make it from scrap wood, but then I remembered I had an old cutting board of sorts that my Mother In Law had given me, and I had a scrabble tile holder!  Light Bulb.


Don't worry it wasn't hand painted, it was just a decal.  So I sanded and sanded, then added a few coats of primer to that side.  I chose to make the previous design side the back.  So I  then glued the scrabble tile holder on to the front..  Like my weight?
Then I sprayed the whole thing a creamy white.

It took a few coats, but I knew I was going to distress a little later so some wood grain showing through was no big deal.
I wanted to give is some character, so I added a few red stripes down the side, sort of like a flour sack.
This is before I sanded.  I still love the result.  Now came the hard part trying to figure out an easel of sorts.
I tried a trowel figuring it was the right angle, but that was a major fail!  All the epoxy did was dissolve the paint and because the base of the trowel was rounded, it just rocked.
So DH went to get a hinge and then cut a piece of wood to use as an easel.  We just needed a way to hold it in the right position.  So I used twine and upholstery tacs!  It is easy to adjust if you need too and works great!


I love how it turned out.  Now I can read recipes easily and won't have to worry about spilling on my expensive toy!


I have a case on my ipad, so that is what is off on the top.  Without the case it fits perfectly on the scrabble tile holder!  And the best part, it only cost me the price of the hinge!  I had all the other items.  Love that part!
What projects have you finally finished!

Have a great week.

Laura

Don't forget to check out what the gals, did as well:

ReneeEmilyKatie and Sherry